

Table of Contents
- Understanding Fish Finder Transducer Mounting Basics
- Transducer Mounting Block Installation for Saltwater Hulls
- Essential Saltwater Marine Electronics Installation Tools
- Step-by-Step Transom Transducer Installation
- Preventing Transducer Interference and Signal Loss
- Testing Sonar Performance and Troubleshooting
- Post-Installation Maintenance for Saltwater Environments
- Conclusion
- Frequently Asked Questions
Last Updated: August 31, 2026
Understanding Fish Finder Transducer Mounting Basics
A fish finder transducer mounting is the process of securely installing a sonar transducer on your boat's hull so it can send and receive sound waves to detect fish and structure below the waterline. Getting this right determines whether your electronics deliver accurate depth readings, fish arches, and bottom composition, or produce nothing but noise and dead zones.
The difference between a properly mounted transducer and a hastily bolted one shows up immediately: one gives you clean sonar images from 5 feet to 200 feet; the other gives you dropouts and signal loss.
The core challenge is positioning. Your transducer needs to sit below the waterline at the right angle, away from propeller turbulence and hull deadrise interference, with cables routed to avoid noise. Saltwater environments add another layer: corrosion, UV exposure, and constant water pressure demand marine-grade sealants and stainless steel hardware.
Transom Placement and Positioning
Transom placement determines your sonar's field of view and signal quality. Most anglers mount on the starboard side of the transom, roughly 12 to 18 inches from the centerline, depending on hull deadrise and propeller location. The transducer should sit 6 to 12 inches below the waterline when the boat is at rest, deep enough to avoid surface turbulence, shallow enough that it doesn't create a blind spot directly under the hull (humminbird.com).
The angle matters as much as depth. A transducer angled 5 to 10 degrees aft (tilted toward the stern) tracks better at cruising speed (garmin.com). If it points straight down, water flow at speed can create cavitation bubbles around the transducer housing, destroying your sonar signal. This is especially critical in saltwater where high-speed trolling means your transducer works hard.
Avoid mounting directly behind the propeller. Propeller turbulence creates cavitation, a wall of bubbles that blocks sonar beams. Position the transducer at least 24 inches to the side of the prop shaft. On twin-engine boats, mount between the engines if the transom allows, or offset significantly to one side.
Mounting Depth and Waterline Considerations
Mounting depth controls what your sonar can see. Too shallow and surface chop creates noise. Too deep and you lose sensitivity to shallow-water structure. The sweet spot is 6 to 12 inches below the waterline at rest.
In saltwater, water level shifts with tide, loading, and fuel burn. Account for this: if your boat rides 2 inches lower when fully loaded, your transducer depth changes. Mark the waterline with tape before installation so you can verify the transducer sits in the right zone under normal fishing conditions.
Hull deadrise, the angle of the transom, affects mounting angle. A deadrise under 15 degrees (flatter transom) allows a more vertical mount. Deadrise over 20 degrees requires tilting the transducer aft to compensate. On a deep-V hull, the angle is critical; a vertical mount on a 25-degree deadrise will give you signal loss at speed.
Transducer Mounting Block Installation for Saltwater Hulls
A mounting block raises the transducer away from the hull surface, improving water flow and reducing interference from the hull's sonar reflection. Saltwater anglers should always use a mounting block rather than mounting directly to the transom.
HDPE and Fiberglass Hull Mounting
High-density polyethylene (HDPE) mounting blocks are the standard for fiberglass hulls. HDPE resists saltwater corrosion, won't crack under UV exposure, and provides a stable platform for the transducer bracket. Drill pilot holes through the mounting block into the transom using stainless steel bolts, washers, and backing plates on the inside of the transom. Backing plates distribute load and prevent fasteners from pulling through the fiberglass.
Apply marine-grade silicone sealant around every bolt hole before installation. This prevents water intrusion into the transom, which causes delamination and structural failure over time. Position the mounting block so the transducer bracket extends 2 to 4 inches below the hull surface, allowing water to flow freely around the transducer housing.
Aluminum Hull Considerations
Aluminum hulls require different hardware. Stainless steel fasteners can create galvanic corrosion when they contact aluminum directly. Use aluminum or bronze fasteners, or isolate stainless steel bolts with rubber washers and backing plates.
Mount the HDPE block the same way as on fiberglass, but seal every fastener hole with marine sealant. Aluminum is more susceptible to water intrusion than fiberglass. Inspect mounting bolts every season and tighten if they've loosened from vibration.
Essential Saltwater Marine Electronics Installation Tools
You need the right tools to install a transducer properly. Improvising leads to crooked mounts, stripped fasteners, and leaks.
Core tools:
- Cordless drill with stainless steel bits
- Hole saw or spade bit for cable pass-through holes
- Torque wrench (set to 15-20 foot-pounds for transducer bracket bolts)
- Silicone caulk gun and marine sealant
- Stainless steel fastener set (bolts, washers, backing plates, lock washers)
- Needle-nose pliers for cable routing
- Waterproof sealant tape for cable connections
- Multimeter for testing sonar signal continuity
Invest in quality stainless steel fasteners. Cheap hardware corrodes in saltwater and fails mid-season.
Step-by-Step Transom Transducer Installation
Drilling and Transom Protection
Start by marking the mounting location using a template from your transducer bracket. Mark pilot hole locations with a pencil. Double-check alignment: the transducer should be 6 to 12 inches below the waterline, 24 inches away from the propeller, and angled correctly for your hull deadrise.
Drill pilot holes through the mounting block into the transom using a bit one size smaller than your fastener diameter. This prevents the drill from slipping and damaging the surrounding fiberglass. Drill straight through; any angle creates misalignment.
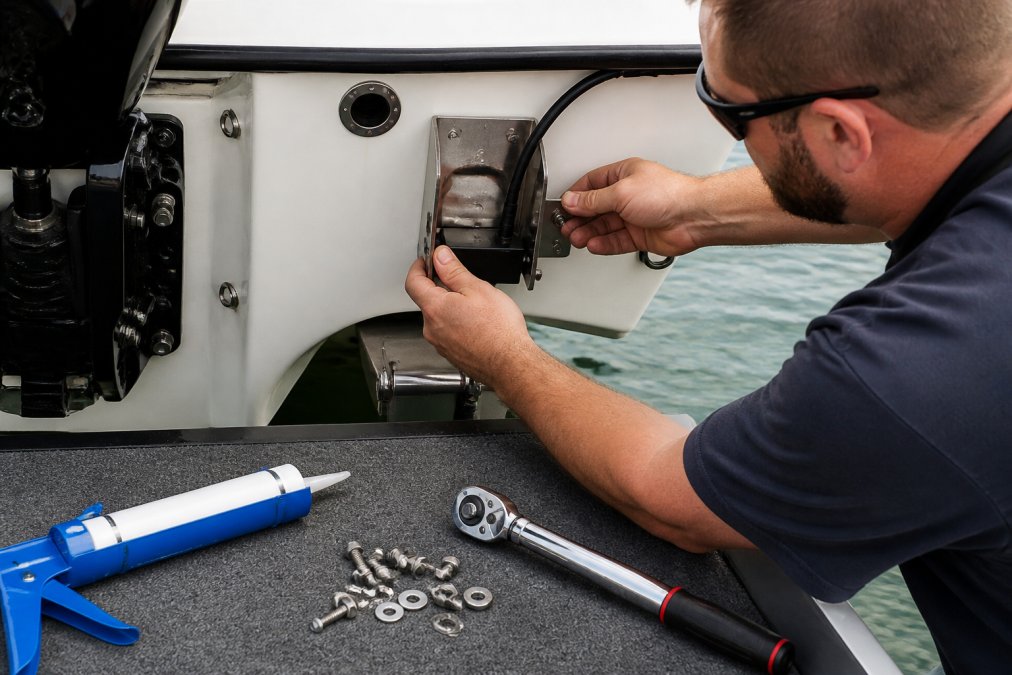
For cable pass-through, drill a hole 1 to 1.5 inches in diameter through the transom, slightly angled downward to prevent water from running in. Seal this hole with a marine cable gland or rubber grommet. Apply silicone sealant around the grommet before inserting cables.
Protect the transom interior by placing a backing plate (aluminum or stainless steel) on the inside of the transom behind each bolt hole. The backing plate distributes load and prevents fasteners from pulling through the fiberglass.
Cable Routing and Management
Route sonar cables away from engine compartments, battery terminals, and electrical systems. Electrical noise from the engine and alternator creates interference that degrades sonar performance. Keep cables at least 12 inches away from high-current wiring.
Run cables along the keel line or along the inside of the gunwale. Secure cables with stainless steel clips every 2 to 3 feet. Avoid routing cables through tight bends; sharp kinks stress the connector and create signal loss.
At the fishfinder unit, connect cables with a waterproof connector or sealed junction box. Wrap connections with waterproof sealant tape to prevent water intrusion.
Marine Sealant and Waterproofing Application
Apply marine-grade silicone sealant around every fastener hole, cable pass-through, and junction. Marine sealant cures in saltwater, resists UV, and remains flexible as the boat moves. Standard caulk fails in weeks.
Lay a bead of sealant around the mounting block perimeter before bolting it to the transom. Bolt the block in place, then apply sealant around the outside of each bolt head. For cable pass-throughs, fill the hole with sealant after inserting the cable gland. Let the sealant cure for 24 hours before launching.
Preventing Transducer Interference and Signal Loss
A mounted transducer can lose signal for several reasons: propeller turbulence, hull reflection, electrical noise, or interference from a second transducer.
Avoiding Propeller Turbulence and Cavitation
Propeller turbulence creates cavitation bubbles that block sonar beams. Position your transducer at least 24 inches away from the propeller shaft. On twin-engine boats, mount between the engines if the transom width allows. If not, offset significantly to the outboard side.
Angle your transducer 5 to 10 degrees aft. This tilts the sonar beam away from the prop wash and reduces cavitation sensitivity. Test different angles by motoring at cruise speed and watching your sonar display. The angle that produces the clearest bottom reading is your target.
Managing Multiple Transducers Without Dead Zones
Running a trolling motor transducer and a transom transducer on the same fishfinder creates coverage across speed ranges. The trolling motor transducer works at low speeds (0 to 10 mph); the transom transducer kicks in at cruise speeds. Elliott's Tackle & Rigging carries dual-transducer setups like the Humminbird XTM-9-20T Trolling Motor Transducer, which mounts directly to your trolling motor and pairs with a transom transducer via a switch on your fishfinder.

Position the two transducers on opposite sides of the boat to avoid interference. Mount the trolling motor transducer on the port side and the transom transducer on the starboard side. Configure your fishfinder to switch between transducers automatically based on speed, ensuring you always have the best signal.
Testing Sonar Performance and Troubleshooting
After installation, test your sonar before heading offshore. Motor to shallow water (8 to 15 feet) and check for a clean bottom reading. You should see a solid line representing the lake or ocean floor. If the display shows noise, gaps, or weak signal, something is wrong.
Check cable connections first. Disconnect and reconnect every cable at the fishfinder and transducer. Corrosion or a loose connector often causes signal loss. Apply a thin layer of dielectric grease to connector pins to prevent corrosion.
Verify transducer depth. If the bottom line is weak or missing, the transducer may be too shallow or too deep. Adjust mounting depth by 2 to 3 inches and retest. If signal is still poor, check for propeller interference by motoring at cruise speed and watching the display. If noise increases dramatically at speed, cavitation is the culprit. Move the transducer farther from the prop or increase the aft angle.
Post-Installation Maintenance for Saltwater Environments
Saltwater corrodes everything. A transducer that works perfectly in fresh water will fail in months without proper maintenance.
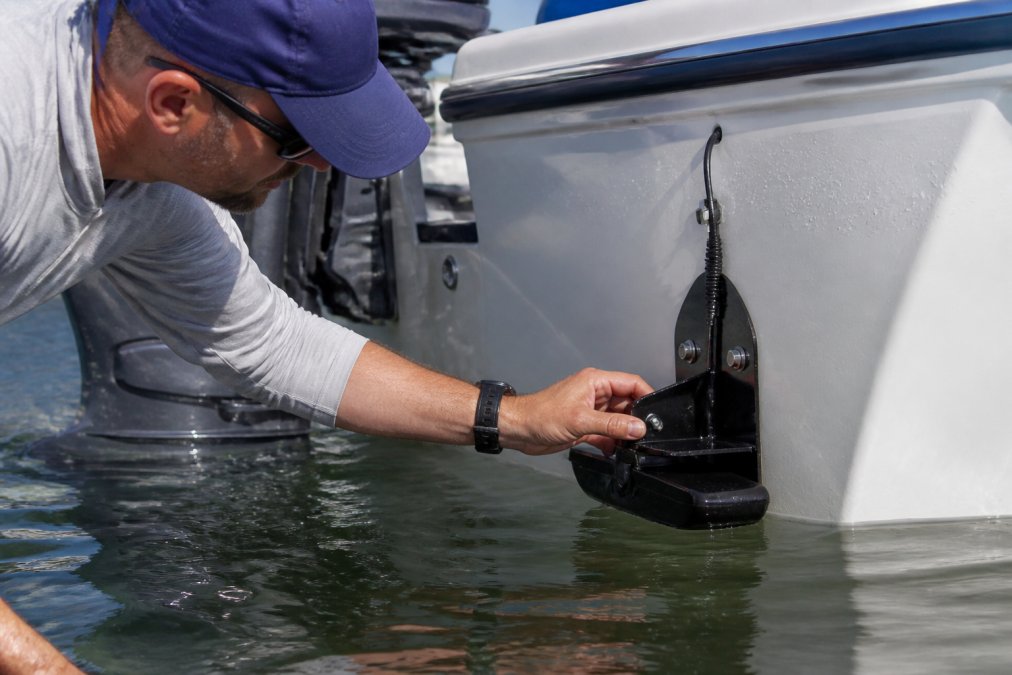
Inspect your transducer and mounting hardware every month during the season. Look for white corrosion around fasteners and connectors. Wipe salt deposits with a damp cloth and apply a thin coat of waterproof grease. Tighten any loose bolts with a torque wrench set to 15-20 foot-pounds.
Check sealant around the mounting block and cable pass-throughs. If sealant is cracked or peeling, remove it and reapply fresh marine sealant. Rinse your boat with fresh water after every saltwater outing, especially around the transducer. At the end of the season, disconnect cables and store your fishfinder indoors. Apply a protective silicone spray to all exposed fasteners and connectors.
Conclusion
Installing a saltwater fish finder transducer correctly takes patience and attention to detail, but the payoff is sonar that works reliably season after season. The key steps, positioning away from propeller turbulence, using marine-grade sealant on every fastener, routing cables cleanly, and testing before you fish, are the same whether you're on the Pacific Northwest coast, the Great Lakes, or the East Coast.
Elliott's Tackle & Rigging stocks everything you need for a professional installation: Humminbird transducers, mounting blocks, stainless steel hardware, and marine sealants. Start with a quality transducer like the Humminbird XTM-9-20T Trolling Motor Transducer or pair it with adapter brackets like the Humminbird AD XTM 9 Trolling Motor Adapter for flexible sonar coverage across all speeds. Get started with Elliott's Tackle & Rigging and fish with confidence, knowing your electronics are mounted to last.

Frequently Asked Questions
How should a fish finder transducer be mounted for saltwater use?
Mount your saltwater fish finder transducer on the transom below the waterline at a depth of 12 to 18 inches, angled slightly downward (2 to 5 degrees). Position it away from through-hull fittings and ensure the transducer face points straight down or slightly aft. Use stainless steel hardware and marine sealant to prevent corrosion. The transducer bracket should be secured firmly to eliminate vibration, which disrupts sonar signal quality. Test at various depths to find optimal performance for your specific hull type.
How close can transducers be mounted to each other without interference?
Maintain at least 24 inches of horizontal separation between dual transducers to prevent transducer interference. If mounting both a sonar transducer and a side-imaging transducer, keep them on opposite sides of the transom when possible. Vertical separation also helps: position one higher and one lower on the transom. Use frequency-switching technology or separate sonar channels to minimize crosstalk. The Humminbird XTM-9-20T trolling motor transducer pairs cleanly with a standard transom mount via a switch, allowing you to pull data from either location without dead zones.
What materials prevent saltwater corrosion when mounting a transducer?
Use stainless steel hardware (bolts, washers, brackets) exclusively for saltwater installations. Select silicone-based marine sealant or polyurethane adhesive rated for saltwater immersion. HDPE mounting blocks resist corrosion better than aluminum in high-salinity environments. Apply sealant around cable penetrations and between the bracket and hull to block water intrusion. Avoid galvanized steel or mild iron fasteners, which corrode rapidly in saltwater. Inspect and reseal annually, especially if you fish in high-salinity or brackish waters.
Should a transducer hang below the boat hull?
Transducers perform best when mounted flush or slightly recessed into the transom rather than protruding below the hull. Flush mounting reduces drag at high speeds and minimizes cavitation around the transducer face. If your hull design requires a stand-off bracket, keep protrusion minimal (under 1 inch). Transducers mounted too far below the hull create turbulent water flow, which degrades sonar signal quality and introduces cavitation noise. Test your specific mounting configuration at cruising speed to confirm clean sonar readings.
This article was written using GrandRanker
0 comments