

Table of Contents
- Why Regular Maintenance Matters for Saltwater Downriggers
- What You'll Need Before You Start Maintaining Your Downrigger
- Step 1: Rinse and Clean Your Downrigger After Each Saltwater Use
- Step 2: Inspect Cables, Booms, and Pulleys for Wear and Damage
- Step 3: Inspect the Downrigger Base and Mount Connection
- Marine Grease for Downriggers: Lubrication Techniques and Products
- Electric Downrigger Maintenance: Battery, Connections, and Display
- Downrigger Cable Replacement: When and How to Re-Spool
Last Updated: July 27, 2026
Why Regular Maintenance Matters for Saltwater Downriggers
Saltwater corrodes metal rapidly, and downriggers take constant abuse in that environment. At Elliott's Tackle & Rigging, we've seen anglers lose expensive equipment to neglect when a few hours of preventive work would have saved thousands. A cable that looks fine one month can snap under load the next. Corrosion accelerates quickly, battery terminals oxidize, pulleys seize, booms develop stress fractures. All preventable with regular maintenance.
Regular maintenance extends your downrigger's lifespan by years, keeps your gear reliable in rough conditions, and saves you money on replacements and repairs. More importantly, it keeps you fishing instead of troubleshooting equipment failures.
What You'll Need Before You Start Maintaining Your Downrigger
Cleaning Supplies and Tools
Start with freshwater and a hose with decent pressure. Soft cloths are essential; microfiber works best because it won't scratch polished surfaces. For cleaning, grab a multipurpose marine cleaner designed for saltwater exposure. Star brite Salt Off Concentrate bonds to salt deposits and lifts them without damaging underlying surfaces. A melamine foam cleaning sponge scrubs stubborn corrosion without being too aggressive on metal.
For lubrication, marine-grade silicone spray is your baseline. Collinite 850 Metal Wax works well for polishing and protecting bare metal surfaces after cleaning. Keep a small brush handy for getting into crevices where salt deposits hide.
Inspection Equipment
A bright flashlight or headlamp is non-negotiable; corrosion hides in shadows. A magnifying glass helps you inspect cable for frays, early detection saves you from a snapped line mid-fight. Keep a simple notebook or phone notes app nearby to track cable condition, unusual sounds, battery voltage readings, and anything that looks off.
| Supply | Purpose | Frequency of Use |
|---|---|---|
| Freshwater & hose | Rinsing salt deposits | After every saltwater use |
| Soft cloths (microfiber) | Drying and polishing | After every use |
| Marine cleaner | Removing salt buildup | Weekly during season |
| Melamine foam sponge | Scrubbing corrosion | As needed |
| Silicone spray | Light lubrication | Monthly |
| Marine grease | Heavy-duty lubrication | Quarterly |
| Flashlight | Inspection | Every maintenance session |
| Magnifying glass | Cable inspection | Monthly |
Step 1: Rinse and Clean Your Downrigger After Each Saltwater Use
Do this every single time you fish saltwater. Start with freshwater immediately after you're off the water; salt dries and bonds to surfaces, making it harder to remove. Spray the entire downrigger, boom, cable, base, and motor housing, paying special attention to joints and the cable spool. Use moderate pressure and rinse for at least two minutes.
After rinsing, dry everything with soft cloths. For stubborn salt buildup, spray Star brite Salt Off Concentrate and let it sit for 5-10 minutes before scrubbing gently with a melamine foam sponge. Rinse again with freshwater and dry thoroughly. This single step prevents 80% of downrigger problems.
Step 2: Inspect Cables, Booms, and Pulleys for Wear and Damage
Checking for Frays and Kinks in Cable
Your cable is the most critical component. Inspect it monthly during the season, more often if you fish frequently. Look for three specific problems: frays (individual strands poking out from the main cable), kinks (permanent bends that signal failure points), and corrosion (reddish-brown or white discoloration).
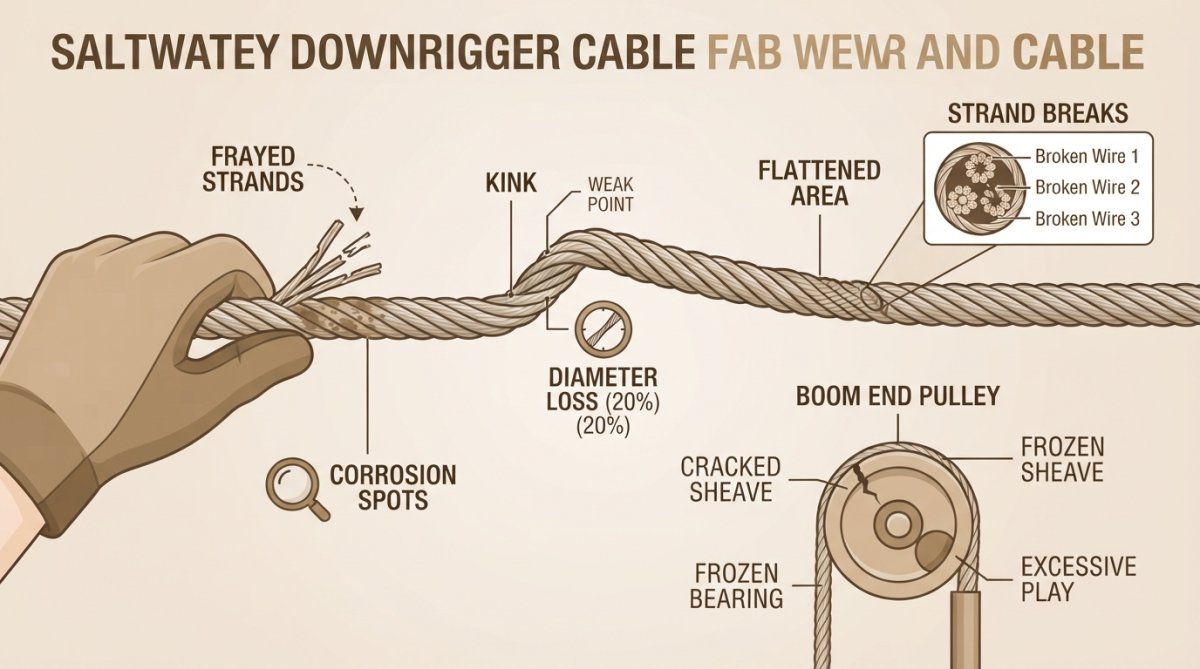
Use your magnifying glass and flashlight to inspect the entire length of cable, especially near the spool and boom where it flexes constantly. If you find frays, seal the end with a small amount of clear epoxy to prevent further fraying. If frays are widespread or you find a kink, the cable needs replacement.
Examining the Boom and Pulley System
The boom and pulley take constant stress. Look for cracks, especially near where it connects to the base and where the pulley mounts. Surface corrosion on the boom is cosmetic; polish it off with Collinite 850 Metal Wax.
Spin the pulley by hand. It should rotate freely and quietly. If it's stiff, noisy, or won't spin, salt has gotten into the bearing. If the pulley wheel itself is cracked or chipped, replace it. Check the pulley mounting bolts and tighten them if needed. Inspect the swivel connection where the boom attaches to the base.
Step 3: Inspect the Downrigger Base and Mount Connection
The base is your downrigger's foundation. Inspect it thoroughly every other month during the season. Check that each mounting bolt is tight. If you find corrosion on the bolt heads, apply a small amount of marine grease to prevent further oxidation. If a bolt won't tighten or spins freely, the threads are stripped and the bolt needs replacement.
Examine the swivel base if you have one. The swivel should move without grinding or excessive friction. If it's stiff, clean it thoroughly with freshwater and apply silicone spray. Check the structural welds where the boom connects to the base for cracks radiating from the weld. These stress fractures indicate the base is failing. Small hairline cracks can be sealed with epoxy as a temporary fix, but plan for replacement.
Look for corrosion on the base itself. Use your marine cleaner and melamine foam sponge to remove it, then dry thoroughly. Apply Star brite Ultimate Aluminum Protectant to seal the surface and prevent future corrosion.
Marine Grease for Downriggers: Lubrication Techniques and Products
Where to Apply Grease on Your Downrigger
Lubrication is the difference between a downrigger that works for five years and one that works for ten. Salt water washes away regular grease, so you need marine-grade products that stick around.
The pulley bearing is your priority. This is where most downriggers fail. Apply marine grease directly into the bearing through the zerk fitting with a grease gun, or remove the pulley and pack the bearing manually. The swivel base needs lubrication on both the rotating joint and the mounting bolts. Apply silicone spray to the rotating joint first, then apply marine grease to the bolts and threads.
The boom connection points need attention. Where the boom meets the base, apply silicone spray monthly to keep the joint moving smoothly. The cable spool needs light lubrication on its bearings. If your spool shows signs of stiffness, a small amount of silicone spray applied around the shaft can help. Be conservative; excess lubricant attracts dirt and salt.
How Often to Lubricate Different Components
Frequency depends on how much you fish. If you're fishing 200+ days per year in heavy saltwater, you'll lubricate more often than a weekend angler.
The pulley bearing should be greased every 30-50 hours of use, or monthly during heavy season. The swivel base gets the same frequency. Cable spool bearings need light attention quarterly if sealed, or monthly if exposed. The boom connection points need silicone spray monthly. Mounting bolts and threads need inspection and light greasing quarterly.
| Component | Lubrication Type | Frequency (Moderate Use) | Frequency (Heavy Use) |
|---|---|---|---|
| Pulley bearing | Marine grease | Monthly | Bi-weekly |
| Swivel base | Silicone spray + grease | Monthly | Bi-weekly |
| Boom connection | Silicone spray | Monthly | Monthly |
| Cable spool bearing | Silicone spray (light) | Quarterly | Monthly |
| Mounting bolts | Marine grease | Quarterly | Monthly |
| Motor shaft (electric) | Per manual | Per manual | Per manual |
Electric Downrigger Maintenance: Battery, Connections, and Display
Battery Terminal Care and Wire Inspection
Electric downriggers add complexity, but the maintenance principles stay the same: keep salt away from electrical components and keep everything dry. The battery terminals are your biggest vulnerability. Corrosion builds up on terminals and causes voltage drop, which weakens the motor and eventually kills the battery. Inspect the terminals monthly for white, blue, or green crusty deposits.
Disconnect the battery and clean the terminals with a small wire brush or old toothbrush. For stubborn deposits, apply a small amount of white vinegar. Scrub gently and dry thoroughly. Once clean, apply a thin coat of marine grease to the terminals to prevent future corrosion.
Inspect all wires running to and from the battery for cracks in the insulation, exposed copper, or loose connections. If you find damaged insulation, the wire needs replacement. Tighten both the positive and negative connections; they should be snug but not over-tightened. Rinse the battery and surrounding area with freshwater after every saltwater use and dry everything thoroughly.
Checking Your Display and Control Systems
The display is your interface to the downrigger, and salt water attacks electronics. Inspect it monthly for cracks, corrosion around the buttons, or water inside the screen. Check the button responsiveness. They should click smoothly without sticking. If a button feels gritty or doesn't respond consistently, salt has gotten inside. Rinse the entire display with freshwater and dry it carefully. If the display still doesn't work properly, it likely needs replacement.
Look for water inside the display screen. If you see moisture, condensation, or cloudiness behind the glass, water has breached the seal. Replace it before it fails mid-season. Check the wiring connections on the back of the display. They should be tight and free of corrosion. If you see corrosion on the connector pins, disconnect the wires and clean the pins with a small wire brush. Apply a tiny amount of silicone grease to the pins before reconnecting.
Test the full control system monthly. Lower and raise the downrigger through its full range. The motor should run smoothly without grinding or unusual noises.
Downrigger Cable Replacement: When and How to Re-Spool
Signs Your Cable Needs Replacement
Cable failure happens fast and at the worst times. Visible fraying is the clearest signal. Kinks are non-negotiable; a kinked cable has a permanent weak point and will fail under load. Corrosion that penetrates the cable surface is serious. Stiffness in the cable is another warning sign; if the cable feels stiff or makes crackling noises when you flex it, internal corrosion is happening. Most quality downrigger cables last 3-5 years with proper maintenance. If your cable is approaching five years and you fish heavily, consider replacing it proactively.
Step-by-Step Cable Re-Spooling Process
Replacing the cable is straightforward. You'll need your new cable, a wrench or socket set, and about 30 minutes.
Step 1: Remove the old cable. Disconnect the cable from the boom by unbolting the attachment point. Loosen the spool mounting bolts and slide the spool out of the downrigger frame.
Step 2: Unwind the old cable. Turn the spool by hand and let the cable unwind completely.
Step 3: Inspect the spool. While the spool is out, check for corrosion, cracks, or damage. Clean the spool thoroughly with freshwater and dry it completely.
Step 4: Thread the new cable. Thread the free end through the spool's cable guide and begin winding it onto the spool.
Step 5: Spool the cable evenly. Wind the cable onto the spool in neat, tight wraps. Each wrap should sit next to the previous one with no gaps.
Step 6: Secure the cable end. Once the spool is full, the free end of the cable needs to be secured. Most downriggers have a set screw or clamp that holds the cable end. Tighten this securely.
Step 7: Reinstall the spool. Slide the spool back into the downrigger frame and tighten the mounting bolts. Make sure the spool spins freely without binding.
Step 8: Attach the cable to the boom. Thread the cable loop through the boom attachment point and secure it with the clevis pin or bolt.
Step 9: Test the system. Lower and raise the downrigger through its full range several times. The cable should spool and unspool smoothly without twisting or binding.
Step 10: Break in the new cable. For the first few trips, fish shallow and don't drop the weight all the way to the bottom. This lets the cable settle onto the spool and stretch slightly.
Maintaining saltwater downriggers isn't complicated, but it's non-negotiable if you want reliable gear. Most maintenance takes just a few hours per season when you stay consistent with it. At Elliott's Tackle & Rigging, we stock everything you need: marine cleaners like Star brite Salt Off Concentrate, protective products like Collinite 850 Metal Wax, and replacement components like the Cannon Aluminum Swivel Base Downrigger Pedestal. Our captain-curated selection means every product is field-tested and built to handle saltwater conditions. Start with a simple post-use rinse, move to monthly inspections, and you'll have a downrigger that lasts for years. Get started with Elliott's Tackle & Rigging and fish with confidence knowing your equipment is solid.
Frequently Asked Questions
How often should you service a downrigger to maintain saltwater downriggers properly?
Rinse your downrigger with freshwater after every saltwater use to prevent corrosion. Perform a detailed inspection monthly during fishing season, checking cables for frays, the boom and pulley for damage, and all connections for rust. Lubricate moving parts quarterly and conduct a full maintenance review before and after the season. Electric downriggers need battery terminal checks every few months. Following a consistent downrigger maintenance schedule prevents costly repairs and extends equipment life.
What kind of marine grease for downriggers should I use on different components?
Use marine-grade multipurpose grease on pulleys, swivel bases, and rod holder connections. For battery terminals, apply a thin dielectric grease to prevent corrosion. Silicone spray works well for cable guides and moving parts that need light lubrication without heavy buildup. Star brite Ultimate Aluminum Protectant protects bare metal surfaces and prevents oxidation. Always consult your downrigger's user manual for manufacturer-specific recommendations, as Cannon, Scotty, and other brands may have different specifications for optimal performance.
When should I replace my downrigger cable, and how do I know it's time?
Replace your downrigger cable when you notice visible frays, kinks, rust spots, or if it no longer holds weight at depth. Cable replacement is typically needed every 2-3 years with regular saltwater use, depending on fishing frequency and storage conditions. Signs include difficulty deploying the weight, cable slipping, or visible damage during inspection. Re-spooling involves removing the old cable, cleaning the spool, and carefully winding new cable at consistent tension. Many anglers prefer professional re-spooling, but detailed user manuals make DIY replacement manageable for experienced anglers.
What are common downrigger troubleshooting issues beyond basic maintenance?
Common downrigger troubleshooting issues include: the weight not deploying smoothly (usually cable tension or pulley misalignment), cable slipping (indicating worn drag system or improper spooling), electric motors failing to respond (battery connection corrosion or loose wires), and display errors on electric models (low battery or corroded terminals). Most issues stem from saltwater corrosion, inadequate freshwater rinsing, or worn components. Systematic inspection of cables, terminals, and moving parts usually identifies the root cause. Persistent problems may require professional service or component replacement.
0 comments